Welcome to Vinayak SQL Tutorial. In this Tutorials explaind completed SQL DBA & development attribute SQL Tutorial for Data Analysis

Query processing architecture guide


Query processing architecture guide


The SQL Server Database Engine processes queries on various data storage architectures such as local tables, partitioned tables, and tables distributed across multiple servers. The following sections cover how SQL Server processes queries and optimizes query reuse through execution plan caching.

Execution modes

The SQL Server Database Engine can process Transact-SQL statements using two distinct processing modes:

  • Row mode execution
  • Batch mode execution

Row mode execution

Row mode execution is a query processing method used with traditional RDBMS tables, where data is stored in row format. When a query is executed and accesses data in row store tables, the execution tree operators and child operators read each required row, across all the columns specified in the table schema. From each row that is read, SQL Server then retrieves the columns that are required for the result set, as referenced by a SELECT statement, JOIN predicate, or filter predicate.

Batch mode execution

Batch mode execution is a query processing method used to process multiple rows together (hence the term batch). Each column within a batch is stored as a vector in a separate area of memory, so batch mode processing is vector-based. Batch mode processing also uses algorithms that are optimized for the multi-core CPUs and increased memory throughput that are found on modern hardware.

When it was first introduced, batch mode execution was closely integrated with, and optimized around, the columnstore storage format. However, starting with SQL Server 2019 (15.x) and in Azure SQL Database, batch mode execution no longer requires columnstore indexes. For more information, see Batch mode on rowstore.

Batch mode processing operates on compressed data when possible, and eliminates the exchange operator used by row mode execution. The result is better parallelism and faster performance.

When a query is executed in batch mode, and accesses data in columnstore indexes, the execution tree operators and child operators read multiple rows together in column segments. SQL Server reads only the columns required for the result, as referenced by a SELECT statement, JOIN predicate, or filter predicate. For more information on columnstore indexes, see Columnstore Index Architecture.

SQL statement processing

Processing a single Transact-SQL statement is the most basic way that SQL Server executes Transact-SQL statements. The steps used to process a single SELECT statement that references only local base tables (no views or remote tables) illustrates the basic process.

Logical operator precedence

When more than one logical operator is used in a statement, NOT is evaluated first, then AND, and finally OR. Arithmetic, and bitwise, operators are handled before logical operators. For more information, see Operator Precedence.

In the following example, the color condition pertains to product model 21, and not to product model 20, because AND has precedence over OR


SQL
SELECT ProductID, ProductModelID
FROM Production.Product
WHERE ProductModelID = 20 OR ProductModelID = 21
  AND Color = 'Red';
GO

You can change the meaning of the query by adding parentheses to force evaluation of the OR first. The following query finds only products under models 20 and 21 that are red.

SQL

SELECT ProductID, ProductModelID
FROM Production.Product
WHERE (ProductModelID = 20 OR ProductModelID = 21)
  AND Color = 'Red';
GO

Optimize SELECT statements

SELECT statement is non-procedural; it doesn't state the exact steps that the database server should use to retrieve the requested data. This means that the database server must analyze the statement to determine the most efficient way to extract the requested data. This is referred to as optimizing the SELECT statement. The component that does this, is called the Query Optimizer. The input to the Query Optimizer consists of the query, the database schema (table and index definitions), and the database statistics. The output of the Query Optimizer is a query execution plan, sometimes referred to as a query plan, or execution plan. The contents of an execution plan are described in more detail later in this article.


Android SQLite :-Android SQLite Database Example Tutorial

 Android SQLite

Android SQLite is a very lightweight database which comes with Android OS. Android SQLite combines a clean SQL interface with a very small memory footprint and decent speed. For Android, SQLite is “baked into” the Android runtime, so every Android application can create its own SQLite databases. Android SQLite native API is not JDBC, as JDBC might be too much overhead for a memory-limited smartphone. Once a database is created successfully its located in data/data//databases/ accessible from Android Device Monitor. SQLite is a typical relational database, containing tables (which consists of rows and columns), indexes etc. We can create our own tables to hold the data accordingly. This structure is referred to as a schema.

Android SQLite SQLiteOpenHelper

Android has features available to handle changing database schemas, which mostly depend on using the SQLiteOpenHelper class. SQLiteOpenHelper is designed to get rid of two very common problems.

  1. When the application runs the first time - At this point, we do not yet have a database. So we will have to create the tables, indexes, starter data, and so on.
  2. When the application is upgraded to a newer schema - Our database will still be on the old schema from the older edition of the app. We will have option to alter the database schema to match the needs of the rest of the app.

SQLiteOpenHelper wraps up these logic to create and upgrade a database as per our specifications. For that we’ll need to create a custom subclass of SQLiteOpenHelper implementing at least the following three methods.

  1. Constructor : This takes the Context (e.g., an Activity), the name of the database, an optional cursor factory (we’ll discuss this later), and an integer representing the version of the database schema you are using (typically starting from 1 and increment later).

  1. public DatabaseHelper(Context context) {
            super(context, DB_NAME, null, DB_VERSION);
        }
    
  2. onCreate(SQLiteDatabase db) : It’s called when there is no database and the app needs one. It passes us a SQLiteDatabase object, pointing to a newly-created database, that we can populate with tables and initial data.

  3. onUpgrade(SQLiteDatabase db, int oldVersion, int newVersion) : It’s called when the schema version we need does not match the schema version of the database, It passes us a SQLiteDatabase object and the old and new version numbers. Hence we can figure out the best way to convert the database from the old schema to the new one.

We define a DBManager class to perform all database CRUD(Create, Read, Update and Delete) operations.

Opening and Closing Android SQLite Database Connection

Before performing any database operations like insert, update, delete records in a table, first open the database connection by calling getWritableDatabase() method as shown below:

public DBManager open() throws SQLException {
        dbHelper = new DatabaseHelper(context);
        database = dbHelper.getWritableDatabase();
        return this;
    }

The dbHelper is an instance of the subclass of SQLiteOpenHelper. To close a database connection the following method is invoked.

 public void close() {
        dbHelper.close();
    }

Inserting new Record into Android SQLite database table

The following code snippet shows how to insert a new record in the android SQLite database.

public void insert(String name, String desc) {
        ContentValues contentValue = new ContentValues();
        contentValue.put(DatabaseHelper.SUBJECT, name);
        contentValue.put(DatabaseHelper.DESC, desc);
        database.insert(DatabaseHelper.TABLE_NAME, null, contentValue);
    }

Content Values creates an empty set of values using the given initial size. We’ll discuss the other instance values when we jump into the coding part.

Updating Record in Android SQLite database table

The following snippet shows how to update a single record.

public int update(long _id, String name, String desc) {
        ContentValues contentValues = new ContentValues();
        contentValues.put(DatabaseHelper.SUBJECT, name);
        contentValues.put(DatabaseHelper.DESC, desc);
        int i = database.update(DatabaseHelper.TABLE_NAME, contentValues, DatabaseHelper._ID + " = " + _id, null);
        return i;
    }

Android SQLite - Deleting a Record

We just need to pass the id of the record to be deleted as shown below.

public void delete(long _id) {
        database.delete(DatabaseHelper.TABLE_NAME, DatabaseHelper._ID + "=" + _id, null);
    }

Android SQLite Cursor

A Cursor represents the entire result set of the query. Once the query is fetched a call to cursor.moveToFirst() is made. Calling moveToFirst() does two things:

  • It allows us to test whether the query returned an empty set (by testing the return value)
  • It moves the cursor to the first result (when the set is not empty)

The following code is used to fetch all records:

 public Cursor fetch() {
        String[] columns = new String[] { DatabaseHelper._ID, DatabaseHelper.SUBJECT, DatabaseHelper.DESC };
        Cursor cursor = database.query(DatabaseHelper.TABLE_NAME, columns, null, null, null, null, null);
        if (cursor != null) {
            cursor.moveToFirst();
        }
        return cursor;
    }

Another way to use a Cursor is to wrap it in a CursorAdapter. Just as ArrayAdapter adapts arrays, CursorAdapter adapts Cursor objects, making their data available to an AdapterView like a ListView. Let’s jump to our project that uses SQLite to store some meaningful data

MS SQL Server - Execution Plans

  MS SQL Server - Execution Plans

Query optimizer with the help of statistics and Algebrizer\processor tree. It is the result of Query optimizer and tells how to do\perform your work\requirement.

There are two different execution plans - Estimated and Actual

Estimated execution plan indicates optimizer view.

Actual execution plan indicates what executed the query and how was it done.

Execution plans are stored in memory called plan cache, hence can be reused. Each plan is stored once unless optimizer decides parallelism for the execution of the query.

There are three different formats of execution plans available in SQL Server - Graphical plans, Text plans, and XML plans.

SHOWPLAN is the permission which is required for the user who wants to see the execution plan.

Example 1

Following is the procedure to view the estimated execution plan.

Step 1 − Connect to SQL Server instance. In this case, 'TEST is the instance name as shown in the following snapshot.


Step 2 − Click on New Query option on the above screen and write the following query. Before writing the query, select the database name. In this case, 'TestDB' is database name.

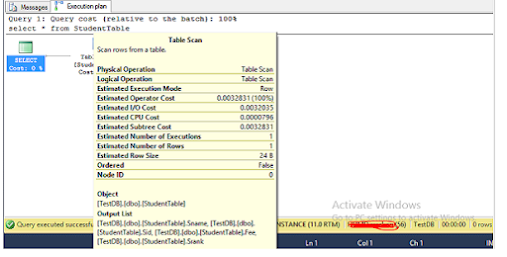
Select * from StudentTable


Step 3 − Click the symbol which is highlighted in red color box on the above screen to display the estimated execution plan as shown in the following screenshot.


Step 4 − Place the mouse on table scan which is the second symbol above the red color box in the above screen to display the estimated execution plan in detail. The following screenshot appears.


SQL Server Reporting Services (SSRS)


What is SQL Server Reporting Services (SSRS)?

SQL Server Reporting Services (SSRS) provides a set of on-premises tools and services that create, deploy, and manage reports. You can design reports using data, tables, graphs, charts, and images. You can easily deploy reports on the local or remote server.

Step 1

Let us first download installation media for SSRS. To download compatible installation media first run SQL Server Setup as shown in this article. Go to the Install SQL Server 2019 Developer Edition section of the article and follow steps 1 and 2. You will see the below screen. Now click on the Install SQL Server Reporting Services link and it will launch a download page for SSRS. Download installation media for SSRS report from that page


Step 2

Now double click and run the downloaded installation media. You will see the below screen. Click on the Install Reporting Services button.


Step 3

It will start the installation of SSRS which will take some time.


Step 4

Next, you will see the configuration wizard. First, you need to connect an SQL server instance for which you want to configure SSRS. Select an instance and click on the Connect button.


Step 5

Next click on the Service Account tab from the left panel. You will see the service account configuration window. Specify windows account to run the report server service. I recommend creating a new dedicated user with administrator privileges for this. I have created one with the name ReportAdmin. Enter your account and password and click on Apply button. It will configure the service account.


Step 6

Next click on the Web Service URL tab from the left panel. Here you can configure the report server URL. We will use this URL to deploy SSRS reports on the report server. You can also configure ports (80 or 443 (SSL)) on which the report server will host. It will preview URLs in the bottom section. I will go with default settings. Click on the Apply button and it will configure the report server web service URL.


Step 7

Next click on the Database tab from the left panel. Here we will configure the database for the report server. Click on the Change Database button.


.